
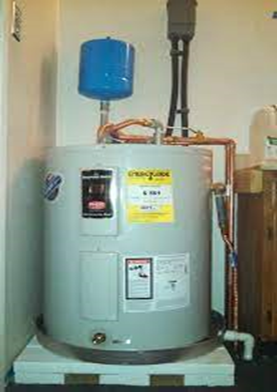
What is an electric water heater?
An electric water heater is an electrical appliance that uses electricity to heat the water. The most common type of electric water heater is the storage tank, which consists of an insulated container where heated and stored until needed. Electric water heaters are often used in residential and commercial settings because they are typically less expensive than gas-powered water heaters. Electric water heaters can be powered by either 120-volt or 240-volt electricity, with the latter being more common in commercial settings. Electric water heaters typically have a higher initial cost than gas-powered models. Still, they are often more energy-efficient in the long run.
This article will cover all the necessary information, including a step-by-step mechanism for installing an electric water heater in homes.
Types of electric water heaters
When choosing an electric water heater, it is essential to consider the different factors like the size of the unit and the type of construction, and the warranty. There are five different types of water heaters. Below are the details of these;
- Conventional Storage Tank Water Heater
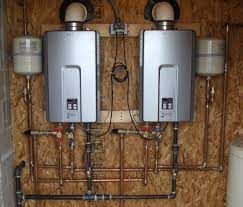
- Tankless Water Heater (On-Demand Water Heater)
- Heat Pump Water Heater (Hybrid Water Heater)
- Solar Powered Water Heater
- Condensing Water Heater
Before starting
Before installing an electric water heater, it is essential to assess the maintenance required. It helps in ensuring that the heater is properly maintained and will not need to be replaced prematurely. Identification of the proper heating element is also important that needs to be used. The heat necessary to raise the water’s temperature will come from this element. Once the assessment is complete and the correct heating element has been selected, the installation can proceed. Always follow instructions carefully to avoid accidents.
Read More: Solar Light Tubes: Pros, Cons, And Everything You Need To Know
Tools and materials required in the installation process
To install an electric water heater correctly, you need some professional tools. Following is the list of tools with which you should be able to install your electric water heater successfully.
Tools
- Adjustable Wrench
- Gloves
In order to install the new water heater with ease, it is best if you have all of these tools at hand. It will make things go much smoother and ultimately save time in getting everything done quickly. Here’s the list of which tools you’ll need.
- Hand Truck
- Pencil
- Pipe Cutter
Materials
Following materials will be required during the installation process of the electric water heater.
- Buckets
- Water Heater Drain Pan
- Electric Water Heater
- Electric Water Heater flexible hose kit
- Garden Hose
Step by step guide on installing electric water heaters
When you’re ready to install your electric water heater, the installation process is pretty straightforward. However, installing an electric water heater will become a relatively simple process by adequately following the following steps.
Step 1. Set the new heater in the proper place
The first step in the installation is to appropriately set the electric water heater so that it functions well. When considering where to place a new electric water heater, it’s important that you first identify which room in your home will be used for this purpose. It is essential to think about access for maintenance, proximity to the clothes washer, and any possibility of flooding. One common place to put an electric water heater is in the basement. Another option is on an exterior wall of the house. Before you decide, it’s important that all of your options are weighed appropriately so as not to just see.
Step 2. Install the new T&P pipe
The second step is to install a new T&P pipe and a value. The T&P valve is a safety feature on your water heater that could save you from an unfortunate incident. First, measure the length of the pipe and cut it to size. Next, attach one end of the pipe to the T&P valve and the other end to the water heater. You will need to purchase a T&P valve that matches the opening on your water heater. Most T&P valve sizes are 3/4” or 1”.
Step 3. Install the discharge pipe:
You’re now ready to install the discharge pipe with the hole drilled and the T&P pipe. Begin by attaching a length of pipe to the discharge port on the pump. Then, run the pipe to the desired exit point. Use elbow joints and T-connectors when you need to route a pipe around obstacles. Once at an exit point of your choice cut the line with saws so it will be easy for us later on when we bring in our equipment.
Finally, attach an adapter to the end of the pipe and secure it in place with screws.
Step 4. Hook Up the water
The fourth step in installing an Electric Water Heater is to hook up the water. To get started you will need an electrical outlet and water supply. You will need two cold water lines and one hot water line. Some of the water heaters we sell come with valves that allow you to control how much hot or cold-water capacity flows into your home.
Then, connect the outlet valve with the hot water pipe. Make sure that you have a tight and secure connection.
Step 5. Soldering Basics
While soldering is a relatively simple process, it requires accuracy and precision to create a strong joint. In addition, soldering is often done in difficult-to-reach places, making it challenging for even experienced workers. However, workers can learn to solder correctly and create strong joints that will last for years with the practice.
Step 6. Install the fittings
The very next step after doing soldering basics is to install the fittings:
You’ll need to connect the cold-water inlet to the supply line. The water heater must be set up correctly and turned on before testing in order for the test results to come back accurate.
Step 7. Secure the proper fittings
To secure the proper fittings, plumbers tape must be used on all body threads. The hose should then be pushed up until there is very little slack. Next, remove the burrs and bubbles from the end of the pipe. Finally, the fitting should be hand-tightened. If necessary, a wrench can be used to finish tightening the fitting, but be careful not to over-tighten, as this could damage the pipe. Following these steps will ensure that the fittings are properly secured.
Step 8. Secure the compression Nut
Slide the compression nut over the end of the pipe. Ensure that the ferrule is in place and that the pipe is flush with the end of the fitting. Tighten the nut by hand until it is fitted against the fitting and then tighten further with an adjustable wrench. Then, use a wrench to tighten this further for an additional quarter turn- making sure that there are no gaps between them. If you cannot do so using just one tool or other available tools in order find out what’s wrong with their connection and secure tighter connections before proceeding further.
Step 9. Install Seismic Straps
Seismic straps are an essential safety measure for homes in earthquake zones. By attaching the straps to electric heaters and anchoring them to a wall or floor, you can help prevent them from toppling over during an earthquake and causing damage or injury. Seismic straps are relatively inexpensive and easy to install, so there’s no excuse not to take this vital step to protect your water heater.
Step 10. Fill in the water tanks
Remove the aerator from the faucet, turn on the water supply, and open all drain valves to bleed air from the lines. Close the drain valves. Slowly turn on the water at the main shutoff valve until the tank is full. Check all connections for leaks. If any are found, tighten them or replace defective parts. When finished, open the drain valves and check for leaks again. If the system is leak-free, close the drain valves and replace the aerator on the faucet. To get rid of the water heater’s phantom load, turn on electricity to it at your main circuit breaker or fuse box. Open all faucets in homes so that air trapped inside can escape and let them run until they are clear.
Step 11. Flush Out the water tanks
The next step is to flush out the water tank; it will be complete when water runs from the faucet into the tank. The water in the tank then heats up and is moved through the pipes to provide heat. Over time, sediment and debris can build up in the tank, affecting the quality of the water and the efficiency of the heater. Run water from the faucet until it runs clear to flush out the system.
Step 12. Check the discharge Pipe
The next step you want to see is to check before leaving your electric water heater maintenance is the discharge pipe. If this pipe is dripping, it means that the pressure in your tank is below 80-PSI. Open the discharge valve and look for any water leaking out to check the discharge pipe. If you see any water leaking, tighten the valve until the leak stops.
Step 13. Check the Aeration
To check the aeration of your electric water heater, open the drain valve at the bottom of the tank and allow the water to run for a few minutes. The water aerator is an essential piece of equipment for anyone who has access to running fresh drinking-water. The small, yet powerful device helps mix air into your home’s plumbing system so it can be bubbles before you drink. However, if the water drains slowly or not, you may need to add a water aerator to the tank.
Although it is theoretically possible for homeowners to install a water heater themselves, there is very little chance that this is a wise or secure decision. Trust the experts to ensure that your water heater installation is done correctly. You wouldn’t want to damage your family or yourself.
Final Words
Installing an electric water heater can be a daunting task. Still, it can be a relatively straightforward process with the right tools and instructions. Thank you for reading our article on installing an electric water heater.


